BobWitte
Member
DISCLAIMER: The modifications I made to the Fehling bars outlined below negate the original purpose of the product. These bars are intended to protect the engine (and possibly the rider). Inasmuch as my bike is now a trike, the rear wheels keep the bars from ever scraping on the ground and offer little or no physical protection per se. My purpose is to use these bars as foot wind protection, horn support and mounts for highway pegs.
OVER EXPLANATION WARNING: If your CTX is the naked model, you are free to skip this posting outright. If yours is a fairing CTX, get a fresh cup of coffee, this looks to be another of my windbag posts! Finally, this information was first posted in the other CTX700 Forum. I re-posted it here since some of you don't read the other source.
Okay, in this post I’m going to detail the steps and materials almost anyone can use to adapt the Fehling Protection bars in order to use them on the CTX700 full fairing bikes. These extremely well made bars come from Germany but are only made to fit the naked model CTX700N’s. Honda just exports the naked CTX’s to Germany, thus Fehling never developed a fairing version in the first place.
The actual differences between the two CTX’s are minimal, but it took a fair amount of trial & error adjustments to finally come to workable adjustments. I started in January 2017 when I bought my first set of bars via their website ( https://www.fehling.de ). Once they got here the first thing that really impressed me was the fit & finish of the product itself quality of the packaging, not to mention the quality of the packaging.
I laid up the bars against my trike and confirmed Fehling’s contention that these bars were specifically for the naked CTX. My quick assessment was that it looked like it would take more than I was willing to mess with at the time to get these beauties to work. So, I decided to sell them and sent them up to a forum member in New York. He actually attempted an install and in so doing determined that the different style of radiator covers on the naked were the most critical issue, but that the bars could be modified to fit. Although according to the parts drawings, the naked version of the radiator covers looked like they might have worked, I decided to make the fairing version work by changing the angle of the bar mountings.
However, he also determined that they weren’t going to do what he wanted most. That was to provide him a convenient place for highway pegs so he sold them off as well and never did the install.
Fast forward to July 2018 and all of a sudden about a dozen Chinese eBay vendors showed up with similar looking bars (which apparently turned out to be counterfeit rip-off’s). Nonetheless, they touted the fact that they had two versions, one for the naked and one for the CTX700D fairing model. I even wrote the one source I eventually bought from to confirm that their bars would actually fit the CTX700 and I was assured they would. So at this point I’ll send the readers back to my posts #494 and following in this very thread for all the gory details about I got duped (and my recovery!).
After returning the Chinese junk for a refund, I purchase another NOS set of the Fehling Protection Bars and proceeded to work on those. I won’t elaborate on the several failed attempts in order to describe what actually worked. Shown below is what the bars look like out of the box:
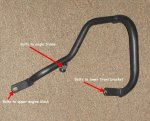
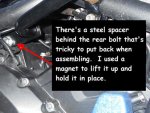
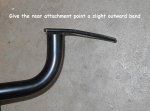
These bars are pretty much mirror images of one another with each having 3 points of attachment to the frame. Starting from the back of the bike, the stock bolts at the top of the engine case will be re-used (but I added lock washers). Although according to the parts drawings, the naked version of the radiator covers looked like they might have worked better (if they fit), I decided to make the fairing version work by changing the angle of the bar mountings. The first step to accomplish this involved putting a slight bend in the rear attachment point as shown below:
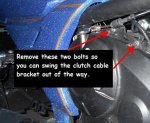
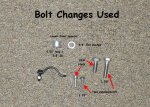
The next two mounting points will involve some changes in the bolts used.
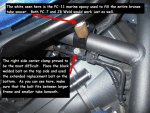
The real work involves the two part clamp welded on a post. The major modification for these clamps was to cut them and add the bronze spacers as pictured below:
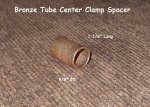
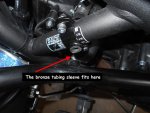
Since I am only concerned with these bars providing me accessory brackets, I opted to save the expense of getting them welded. This is why I used 1.125” bronze spacers glued in place instead:
Apparently there is a five picture Forum limit, so the remaining information is contained in the next post.
OVER EXPLANATION WARNING: If your CTX is the naked model, you are free to skip this posting outright. If yours is a fairing CTX, get a fresh cup of coffee, this looks to be another of my windbag posts! Finally, this information was first posted in the other CTX700 Forum. I re-posted it here since some of you don't read the other source.
Okay, in this post I’m going to detail the steps and materials almost anyone can use to adapt the Fehling Protection bars in order to use them on the CTX700 full fairing bikes. These extremely well made bars come from Germany but are only made to fit the naked model CTX700N’s. Honda just exports the naked CTX’s to Germany, thus Fehling never developed a fairing version in the first place.
The actual differences between the two CTX’s are minimal, but it took a fair amount of trial & error adjustments to finally come to workable adjustments. I started in January 2017 when I bought my first set of bars via their website ( https://www.fehling.de ). Once they got here the first thing that really impressed me was the fit & finish of the product itself quality of the packaging, not to mention the quality of the packaging.
I laid up the bars against my trike and confirmed Fehling’s contention that these bars were specifically for the naked CTX. My quick assessment was that it looked like it would take more than I was willing to mess with at the time to get these beauties to work. So, I decided to sell them and sent them up to a forum member in New York. He actually attempted an install and in so doing determined that the different style of radiator covers on the naked were the most critical issue, but that the bars could be modified to fit. Although according to the parts drawings, the naked version of the radiator covers looked like they might have worked, I decided to make the fairing version work by changing the angle of the bar mountings.
However, he also determined that they weren’t going to do what he wanted most. That was to provide him a convenient place for highway pegs so he sold them off as well and never did the install.
Fast forward to July 2018 and all of a sudden about a dozen Chinese eBay vendors showed up with similar looking bars (which apparently turned out to be counterfeit rip-off’s). Nonetheless, they touted the fact that they had two versions, one for the naked and one for the CTX700D fairing model. I even wrote the one source I eventually bought from to confirm that their bars would actually fit the CTX700 and I was assured they would. So at this point I’ll send the readers back to my posts #494 and following in this very thread for all the gory details about I got duped (and my recovery!).
After returning the Chinese junk for a refund, I purchase another NOS set of the Fehling Protection Bars and proceeded to work on those. I won’t elaborate on the several failed attempts in order to describe what actually worked. Shown below is what the bars look like out of the box:

These bars are pretty much mirror images of one another with each having 3 points of attachment to the frame. Starting from the back of the bike, the stock bolts at the top of the engine case will be re-used (but I added lock washers). Although according to the parts drawings, the naked version of the radiator covers looked like they might have worked better (if they fit), I decided to make the fairing version work by changing the angle of the bar mountings. The first step to accomplish this involved putting a slight bend in the rear attachment point as shown below:

The next two mounting points will involve some changes in the bolts used.

The real work involves the two part clamp welded on a post. The major modification for these clamps was to cut them and add the bronze spacers as pictured below:

Since I am only concerned with these bars providing me accessory brackets, I opted to save the expense of getting them welded. This is why I used 1.125” bronze spacers glued in place instead:

Apparently there is a five picture Forum limit, so the remaining information is contained in the next post.
Last edited:

