Shanghai Dan
New member
Many of you know I ride. A LOT. 40,000 miles in the two years I've had the CTX - and that includes being overseas (and off the bike) for 10 of those 24 months. Yep, nearly 700 miles a week!
Last trip (2 weeks ago) I dropped my CTX off at the dealer and had new tires, chain, and sprocket done (they also did the brakes for free labor - parts only - I'll take it!). The service manager was SHOCKED when I told him they were the original chain and sprocket set. In Ventura, it's typical to get 8-10K out of a chain and sprocket set - no more than that. Salty and sandy environment, lots of dry conditions, and riders who tend to think 500 miles a month is a lot all conspire to kill chains.
I have a Pro Oiler (I know a few others do as well). It's a positive displacement pump that uses either GPS or rotations (what I use) to determine when to oil your chain. I have mine dialed in a little "wet" for my region, but I'd rather fling a bit more oil on my underside and keep the $350 worth of parts and labor nice and rare to replace. I run straight engine oil in it. You know that extra oil left in the gallon, when you do the oil change? That turns out to be the right amount I'll go through, between oil changes (6K miles) - so that's where I "use" the rest.
Anyway, the Pro Oiler is a great system, but it does have a pretty cheesy mount. A piece of metal, you screw into your swingarm, and hope it doesn't bend. I don't like it, it's always in the way, and a pain to mount/remove. It works, but barely. And you have to bend it to get the oiler nozzles in the right location.
Enter - CAD and 3D printer! Friday, I got to noodling as I was putting air in the rear tire. Why don't I make a custom designed mount for the nozzle? Angle, position, all set appropriately. So I sat down with a caliper, made some quick measurements, cranked on the 3D model for about 15 minutes, and was done. Two hours of printing with ABS later, and I had my new mount. Ten minutes after that - all installed and verified - it works!
Here's what I ended up with:
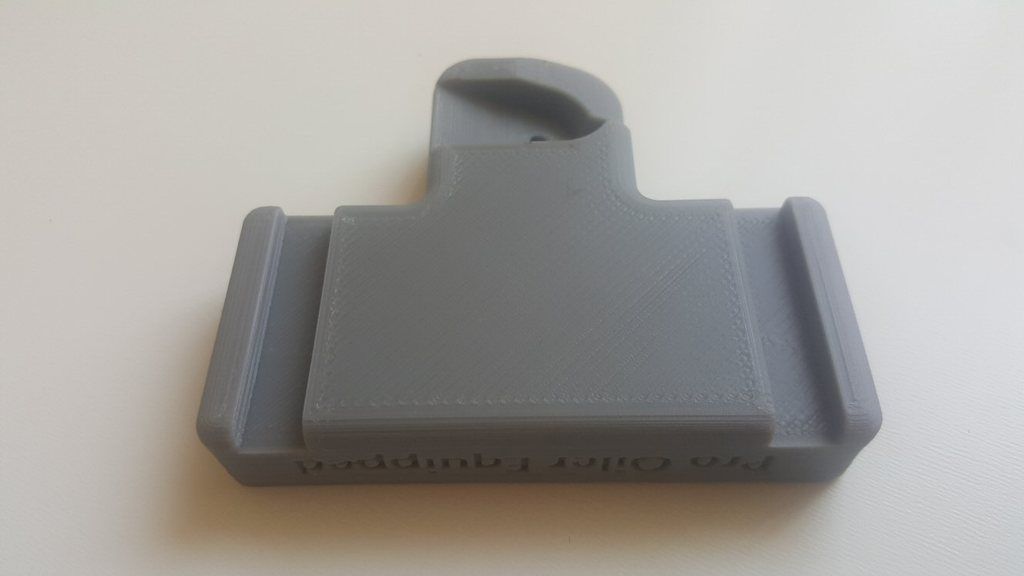
The basic concept. Even put "Pro Oiler Equipped" on the side. Perhaps I'll paint that in with a nice yellow or something. Basic idea is a big block that is ZIP-tied (see the channels?) to the swingarm, then an extension that holds the double-sided nozzle at the proper location and angle.

How it is supposed to fit together. A #6 screw (or 4mm) will go through tight - which is what I want! An interference fit of the screw and mounting holes. Don't worry, I'll use a lock washer and nut as well to secure it all together.
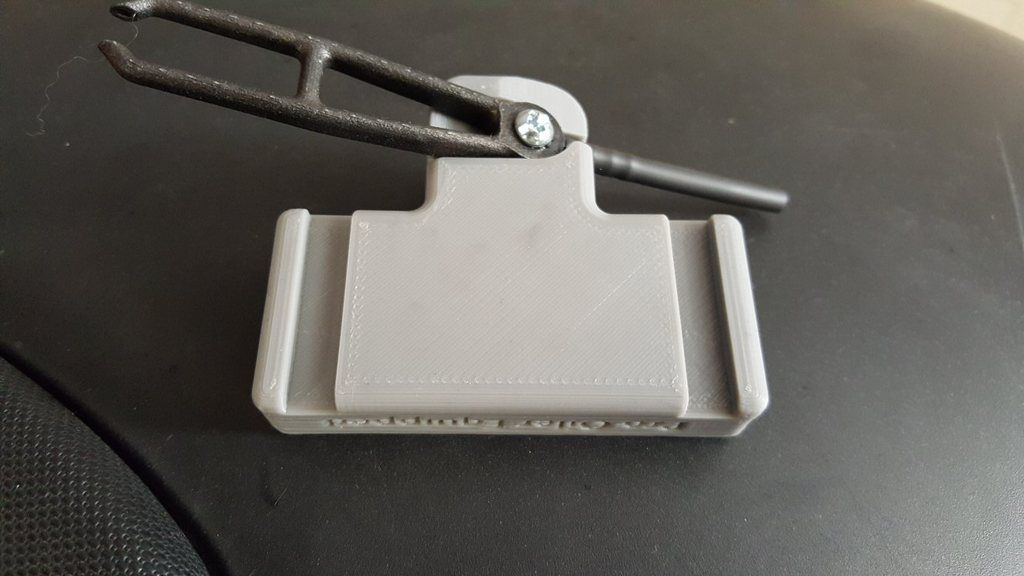
Here we go! This is how it is assembled together. Now it is ready to install on the swingarm. Two 11" long ZIP ties, plug the Pro Oiler oil line feed into the nozzle, and I should be done.
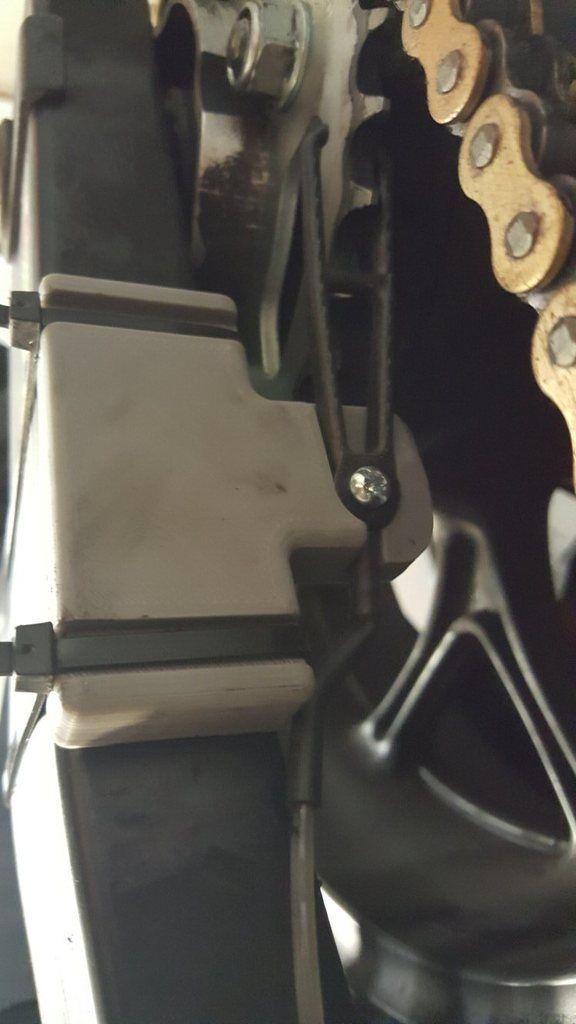
How I aligned the nozzle. The front and back of the main mounting block are "flush" with the inside and outside surfaces of the swingarm, making it easy to align by feel. This will put the sprocket directly between the two nozzle outlets. And the angle and position put it just 1 inch above the chain, drips nicely on to the chain AND the sprocket!

All dressed up and ready! Perfectly secure with a pair of tight ZIP ties - doesn't move at all. If you were paranoid, a small piece of double sided tape would ensure it doesn't move forward/rearward, and of course you can use other means to secure the ZIP ties as well. But it is tight and doesn't wiggle.
Overall, a nice little improvement. No worries about removing when it's time to change tires - cut two ZIP ties, plop off the oil feed line, and it's all clear. Installation is a snap. And alignment is automatic.
Now for the offer: for anyone who has a CTX and Pro Oiler, I'll 3D print you one of these, gratis. Just pay shipping! And if you want to 3D print your own, let me know. I can share the file in a variety of formats, including SolidWorks, Alibre (what I use), STEP, IGES, or straight-out STL for direct 3D print. I used Polyworks ABS, a Lulzbot Mini printer, and 30 minutes of total time...")
Last trip (2 weeks ago) I dropped my CTX off at the dealer and had new tires, chain, and sprocket done (they also did the brakes for free labor - parts only - I'll take it!). The service manager was SHOCKED when I told him they were the original chain and sprocket set. In Ventura, it's typical to get 8-10K out of a chain and sprocket set - no more than that. Salty and sandy environment, lots of dry conditions, and riders who tend to think 500 miles a month is a lot all conspire to kill chains.
I have a Pro Oiler (I know a few others do as well). It's a positive displacement pump that uses either GPS or rotations (what I use) to determine when to oil your chain. I have mine dialed in a little "wet" for my region, but I'd rather fling a bit more oil on my underside and keep the $350 worth of parts and labor nice and rare to replace. I run straight engine oil in it. You know that extra oil left in the gallon, when you do the oil change? That turns out to be the right amount I'll go through, between oil changes (6K miles) - so that's where I "use" the rest.
Anyway, the Pro Oiler is a great system, but it does have a pretty cheesy mount. A piece of metal, you screw into your swingarm, and hope it doesn't bend. I don't like it, it's always in the way, and a pain to mount/remove. It works, but barely. And you have to bend it to get the oiler nozzles in the right location.
Enter - CAD and 3D printer! Friday, I got to noodling as I was putting air in the rear tire. Why don't I make a custom designed mount for the nozzle? Angle, position, all set appropriately. So I sat down with a caliper, made some quick measurements, cranked on the 3D model for about 15 minutes, and was done. Two hours of printing with ABS later, and I had my new mount. Ten minutes after that - all installed and verified - it works!
Here's what I ended up with:

The basic concept. Even put "Pro Oiler Equipped" on the side. Perhaps I'll paint that in with a nice yellow or something. Basic idea is a big block that is ZIP-tied (see the channels?) to the swingarm, then an extension that holds the double-sided nozzle at the proper location and angle.

How it is supposed to fit together. A #6 screw (or 4mm) will go through tight - which is what I want! An interference fit of the screw and mounting holes. Don't worry, I'll use a lock washer and nut as well to secure it all together.

Here we go! This is how it is assembled together. Now it is ready to install on the swingarm. Two 11" long ZIP ties, plug the Pro Oiler oil line feed into the nozzle, and I should be done.

How I aligned the nozzle. The front and back of the main mounting block are "flush" with the inside and outside surfaces of the swingarm, making it easy to align by feel. This will put the sprocket directly between the two nozzle outlets. And the angle and position put it just 1 inch above the chain, drips nicely on to the chain AND the sprocket!

All dressed up and ready! Perfectly secure with a pair of tight ZIP ties - doesn't move at all. If you were paranoid, a small piece of double sided tape would ensure it doesn't move forward/rearward, and of course you can use other means to secure the ZIP ties as well. But it is tight and doesn't wiggle.
Overall, a nice little improvement. No worries about removing when it's time to change tires - cut two ZIP ties, plop off the oil feed line, and it's all clear. Installation is a snap. And alignment is automatic.
Now for the offer: for anyone who has a CTX and Pro Oiler, I'll 3D print you one of these, gratis. Just pay shipping! And if you want to 3D print your own, let me know. I can share the file in a variety of formats, including SolidWorks, Alibre (what I use), STEP, IGES, or straight-out STL for direct 3D print. I used Polyworks ABS, a Lulzbot Mini printer, and 30 minutes of total time...